org.springframework.validation.DataBinder
데이터 바인딩이란?
- 프로퍼티 값을 타겟 객체에 설정하는 기능
- 사용자가 입력한 값을 application domain 객체에 동적으로 할당하는 기능
사용자가 입력한 값은 보통 문자열
객체가 가지고있는 값의 타입은 다양한 스트링, int, 객체 자체 등등 각각에 맞게 변환하여 바인딩 해주는 것.
PropertyEditor
- 스프링 3.0 이전까지 DataBinder 가 변환 작업 사용하던 인터페이스
- ApplicationContext를 xml 파일로 설정할때, xml 파일에 입력한 문자열을 빈이 가지고 있는 적절한 타입으로 변환하여 넣어줄때 사용되었음.
- 쓰레드 세이프 하지 않다. (상태 정보 저장 하고 있다. 따라서 싱글톤 빈으로 등록해서 쓰다가는 .. 안됀다)
- Obejct 와 String 간의 변환만 할 수 있어, 사용 범위가 제한적이다. 하지만 잘써왔다.
- String 을 객체로 만들기
1) controller
package com.bpkim.demospring51;

import org.springframework.web.bind.WebDataBinder;
import org.springframework.web.bind.annotation.GetMapping;
import org.springframework.web.bind.annotation.InitBinder;
import org.springframework.web.bind.annotation.PathVariable;
import org.springframework.web.bind.annotation.RestController;

@RestController
public class EventController {

    @InitBinder
    public void init(WebDataBinder webDataBinder){
        webDataBinder.registerCustomEditor(Event.class, new EventEditor());
    }

    @GetMapping("/event/{event}")
    public String getEvent(@PathVariable Event event){
        System.out.println(event);
        return event.getId().toString();
    }
}
2) 사용할 클래스파일 Event
package com.bpkim.demospring51;

public class Event {
    Integer id ;

    String title;

    public Event(Integer id) {
        this.id = id;
    }

    public Integer getId() {
        return id;
    }

    public void setId(Integer id) {
        this.id = id;
    }

    public String getTitle() {
        return title;
    }

    public void setTitle(String title) {
        this.title = title;
    }


    @Override
    public String toString() {
        return "Event{" +
                "id=" + id +
                ", title='" + title + '\'' +
                '}';
    }
}
3) Test
package com.bpkim.demospring51;

import org.junit.Test;
import org.junit.runner.RunWith;
import org.springframework.beans.factory.annotation.Autowired;
import org.springframework.boot.test.autoconfigure.web.servlet.WebMvcTest;
import org.springframework.test.context.junit4.SpringRunner;
import org.springframework.test.web.servlet.MockMvc;

import static org.springframework.test.web.servlet.request.MockMvcRequestBuilders.get;
import static org.springframework.test.web.servlet.result.MockMvcResultMatchers.content;
import static org.springframework.test.web.servlet.result.MockMvcResultMatchers.status;

@RunWith(SpringRunner.class)
@WebMvcTest
public class EventControllerTest {

    @Autowired
    MockMvc mockMvc;

    @Test
    public void getTest() throws Exception{
        mockMvc.perform(get("/event/1"))
                .andExpect(status().isOk())
                .andExpect(content().string("1"));
    }
}
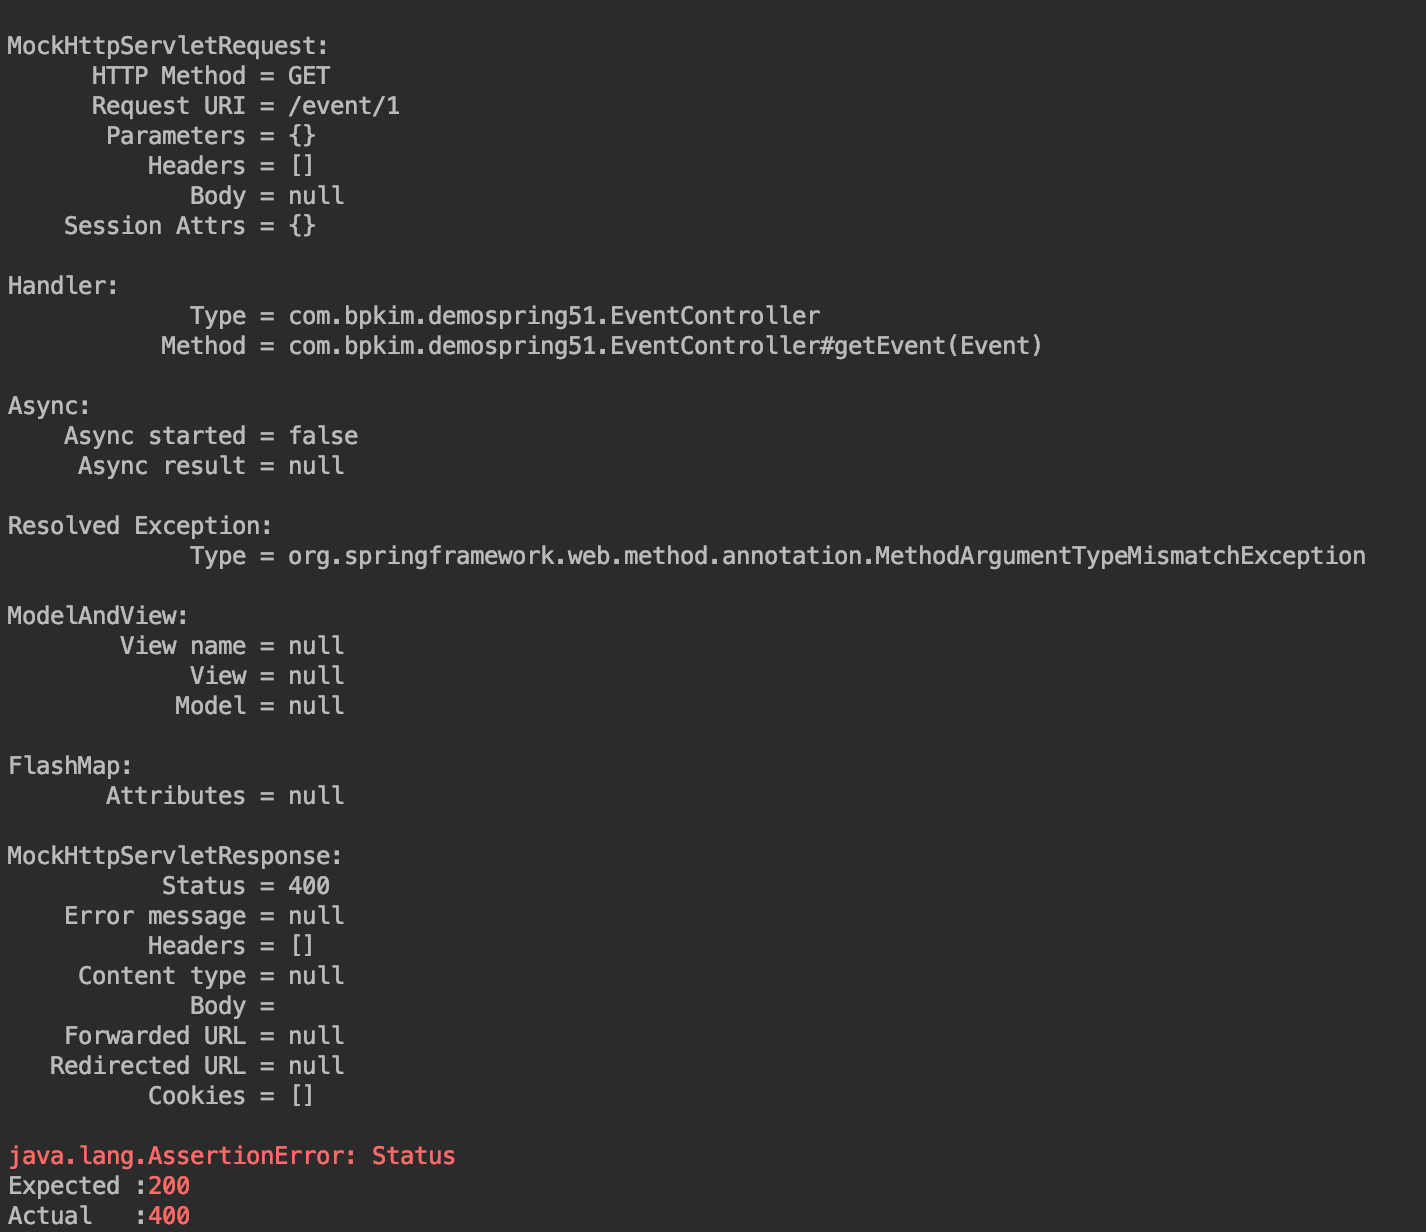
- Test 실행 결과
에러! 받은 string 값을 바로 객체로 바인딩 하지 못해 에러가 발생! >> BindEditor 생성
4) BinderEditor 생성
- PropertyEditor 를 상속하면 인터페이스이므로 구현해야할 함수가 많아 PropertyEditorSupport 를 상속하여 필요한 두 함수만 구현
setAsText > Text 값을 객체로 변환
getAsText > 객체 값을 Text 로 변환
package com.bpkim.demospring51;

import java.beans.PropertyEditorSupport;

public class EventEditor extends PropertyEditorSupport {

    @Override
    public String getAsText() {
        // getValue() 객체를 가져온다.
        // Event 타입으로 변환
        Event event = (Event)getValue();

        // Event 의 id 를 리턴
        return event.getId().toString();
    }

    // Text 를 Event 로 변환
    @Override
    public void setAsText(String text) throws IllegalArgumentException {

        // text 를 이용해 그대로 객체 생성하여 setValue
        setValue(new Event(Integer.parseInt(text)));

    }

    /*
        setValue 한 값은 상태 정보를 저장하고있다.
        Theread safe 하지 않다.
        propertyEditor의 구현체는 여러 스레드에 공유해서 쓰면 안된다. >> Bean 으로 등록하여 사용해선 안된다.
        theread scope 로 등록해서 사용하면 되지만...  전혀 빈으로 등록하지 않는 것을 추천한다.

        @InnitBinder 로 컨트롤러에서 등록하여 사용하자
     */
}
- PropertyEditor 특징
setValue 한 값은 상태 정보를 저장하고있다.
Theread safe 하지 않다.
propertyEditor의 구현체는 여러 스레드에 공유해서 쓰면 안된다. >> Bean 으로 등록하여 사용해선 안된다.
theread scope 로 등록해서 사용하면 되지만... 전혀 빈으로 등록하지 않는 것을 추천한다.
@InnitBinder 로 컨트롤러에서 등록하여 사용하자
5) 컨트롤러 수정
package com.bpkim.demospring51;

import org.springframework.web.bind.WebDataBinder;
import org.springframework.web.bind.annotation.GetMapping;
import org.springframework.web.bind.annotation.InitBinder;
import org.springframework.web.bind.annotation.PathVariable;
import org.springframework.web.bind.annotation.RestController;

@RestController
public class EventController {

    @InitBinder
    public void init(WebDataBinder webDataBinder){
        webDataBinder.registerCustomEditor(Event.class, new EventEditor());
    }

    @GetMapping("/event/{event}")
    public String getEvent(@PathVariable Event event){
        System.out.println(event);
        // event 에 들어온 값을 Event 객체로 변환 시켜줘야한다.
        // 그래서 변환 할 PropertyEditor을 만들어줘야 한다.

        return event.getId().toString();
    }
}
- 실행 결과
: 성공!
event 객체를 출력한 모습도 확인 가능하다.

'개발 > Spring' 카테고리의 다른 글
| SpEL(스프링 Expression Language) (1) | 2021.04.23 |
|---|---|
| 데이터 바인딩 추상화 Converter와 Formatter (1) | 2021.04.23 |
| Validation 추상화 (1) | 2021.04.22 |
| Resource 추상화 (0) | 2021.04.22 |
| Ioc 컨테이너 - ResourceLoader (0) | 2021.04.22 |


